Make No Waste Flying Geese in Different Color Combinations
Cutting Instructions
No waste flying geese are easy and accurate. You’ll make four different variations of flying geese but they are all constructed using the same easy technique.
Avoid confusion by focusing on one flying geese variation at a time. Start by cutting one large square and four of the smaller squares required for the same variation to sew four identical flying geese.
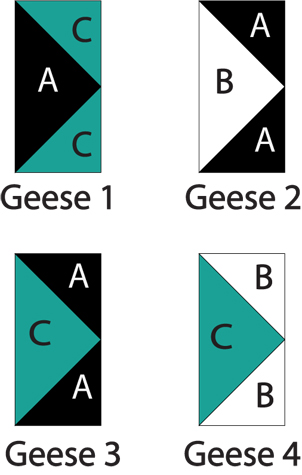
Geese #1
- (13) 5-1/4″ x 5-1/4″ Fabric A Squares (you should already have 5)
- (52) 2-7/8″ x 2-7/8″ Fabric C squares
- You will make 52 flying geese that measure 2-1/2″ x 4-1/2″
Geese #2
- (13) 5-1/4″ x 5-1/4″ Fabric B Squares
- (52) 2-7/8″ x 2-7/8″ Fabric A squares
- You will make 52 flying geese that measure 2-1/2″ x 4-1/2″
Geese #3
- (7) 5-1/4″ x 5-1/4″ Fabric C1 Squares (you should have these)
- (28) 2-7/8″ x 2-7/8″ Fabric A squares
- You will make 28 flying geese that measure 2-1/2″ x 4-1/2″ (a few may not be used)
Geese #4
- (7) 5-1/4″ x 5-1/4″ Fabric C1 Squares (you will need to cut a few more)
- (28) 2-7/8″ x 2-7/8″ Fabric B squares
- You will make 28 flying geese that measure 2-1/2″ x 4-1/2″ (a few may not be used)
How to Sew the No Waste Flying Geese
Use the illustrations below as a guide but disregard the colors. You will make the four geese types shown above and your own fabrics will differ.
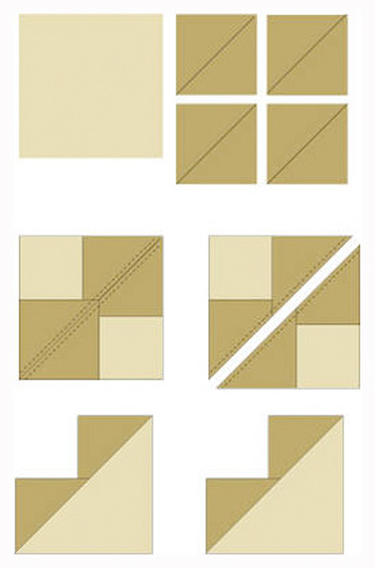
- Grab one 5-1/4″ square for the type of geese you are making and four of the 2-7/8″ squares for the same geese type (top drawing).
- Draw a line from one corner to the opposite corner on the reverse side of the four small squares. Use a light pencil on dark fabrics or make a crease instead.
- Position two small squares on the large square, right sides together and small squares in opposite corners as illustrated below. The lines on the reverse sides of the small squares should match at their ends (middle drawing, left).
- Secure small squares with straight pins.
- Sew a seam on each side of the lines using a scant 1/4″ seam allowance or the allowance you found worked best when making half square triangle units.
- Cut the patchwork in half on the drawn lines (middle drawing, right).
- Press the triangles open (bottom drawing).
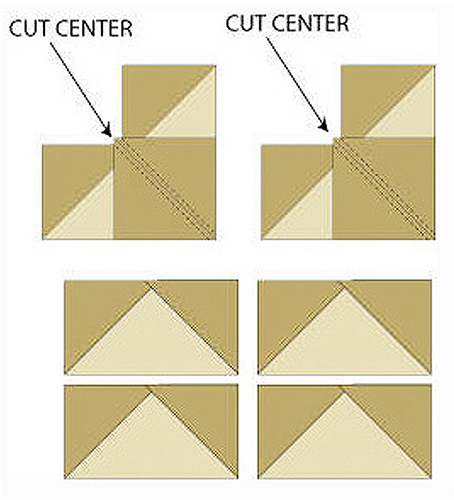
Finish Sewing the Flying Geese
- Place a small square in the bottom corner of each of the units you just created, right sides together and marked lines positioned as shown.
- Sew two seams, each a scant 1/4″ from the lines, to attach the new square to each unit.
- Cut each apart on the line.
- Press the triangles open to create four flying geese that measure 2-1/2″ x 4-1/2″ (bottom drawing).
- Remember to trim ‘dog ears,’ the tiny triangles that form at the ends of seam allowances where triangles are sewn together.
- Refer to the top of the page to make the required number of each type of flying geese.