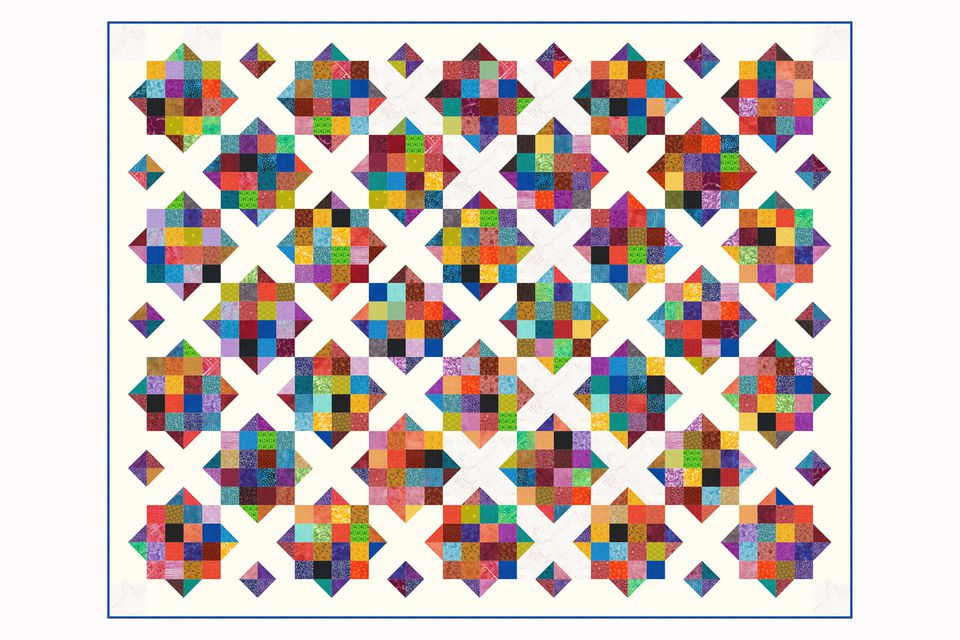
Got scraps? Try this super simple quilt pattern to create a quilt that measures about 56″ x 72″ with its patchwork border. The quilt is designed with two easy quilt blocks—a block commonly known as “X” and a 16-patch scrappy block.
Read the entire pattern before beginning.
2-1/2″ wide jelly roll strips work perfectly for this quilt, but it’s a cinch to cut your strips from a variety of fabrics. Sew a quilt that’s a scrappy as you wish but do try to use light and dark fabrics of different print scales. If your fabrics are limited—your final project will still be a winner.
Make 32 16-Patch Quilt Blocks
It’s a little hard to stipulate yardages for the 16-patch blocks because you’ll be working with a scrappy assortment of fabrics. Pay more attention to the number of rows you must construct than the actual yardage. Read the instructions before beginning.
Use a 1/4″ seam allowance throughout.
- Sew four unlike 2-1/2″ wide fabric strips together side by side. Length isn’t important, and the four strips needn’t be the same length.
- Press to set seams and then press seam allowances in one direction. The strip set should be 8-1/2″ wide. If it isn’t, press again and recheck. If the width is still off, test to make sure your 1/4″ seam allowance is accurate.
- Square up one end of the strip set and cut as many 2-1/2″ long segments from it as possible.
- Repeat. You’ll need a total of 128 segments to make all 32 quilt blocks.
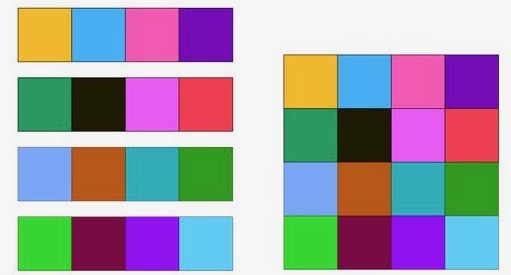
- You might have very small pieces of fabric to use. If you do, sew four 2-1/2″ x 2-1/2″ squares side-by-side to create a row.
- Mix up your rows and choose four that are unlike. If you reach a point where some rows are identical, flip one around so that fabrics are oriented differently.
- Arrange the four rows as shown below. Sew together, butting seams to match perfectly. Pin-match if necessary to keep seams aligned. Press. The 16-patch block should measure 8-1/2″ x 8-1/2″. Repeat to make a total of 32 blocks.
Make 31 X Quilt Blocks
- Cut (124) 4-1/2″ x 4-1/2″ squares for backgrounds (about 2 yards if using the same fabric).
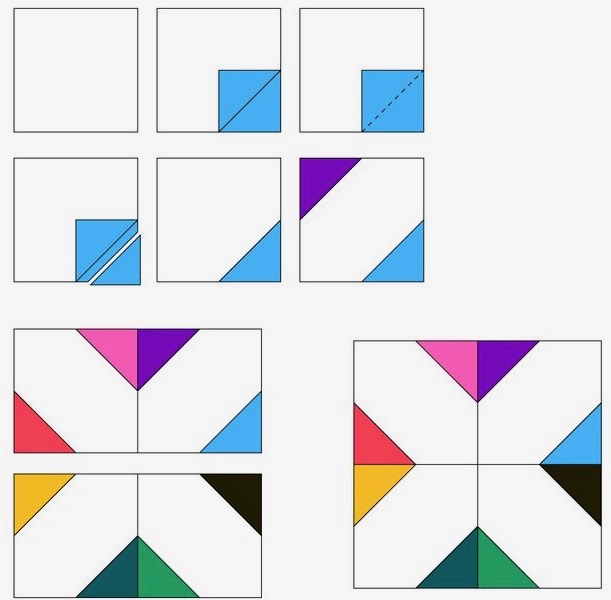
- Cut (248) 2-1/2″ x 2-1/2″ squares from remaining scraps. Draw a line from one corner to the opposite corner on the back of each.
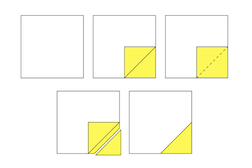
- Align a small square in one corner of a larger square, placing right sides together with the drawn line as shown. All edges should match.
- Sew a seam on the line. Trim the excess corner of the fabrics, leaving a 1/4″ seam allowance.
- Repeat on the opposite corner.
- Press to set the seams and then press seam allowances towards the small triangles.
- Sew three more patchwork squares, but use a variety of fabrics in their corners.
- Arrange the four into two rows as shown and sew each row together. Press seam allowances in opposite directions and join the rows. The X quilt block should measure 8-1/2″ x 8-1/2″.
- Create a total of 31 X quilt blocks.
Assemble the Quilt
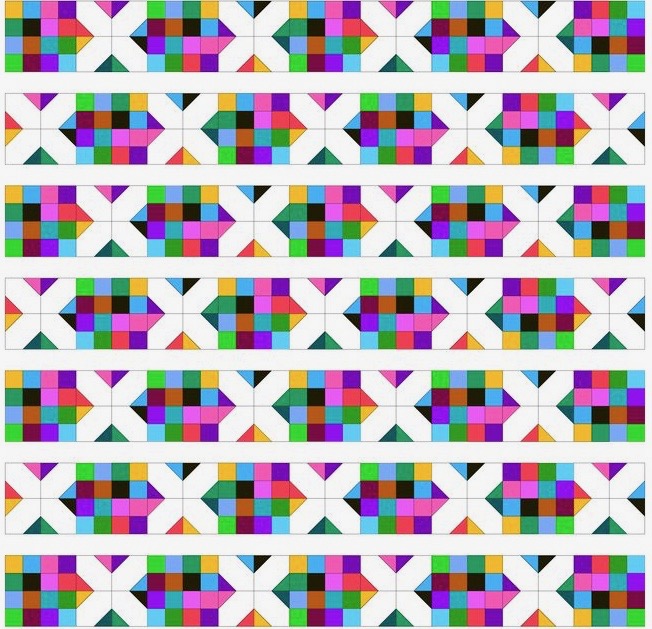
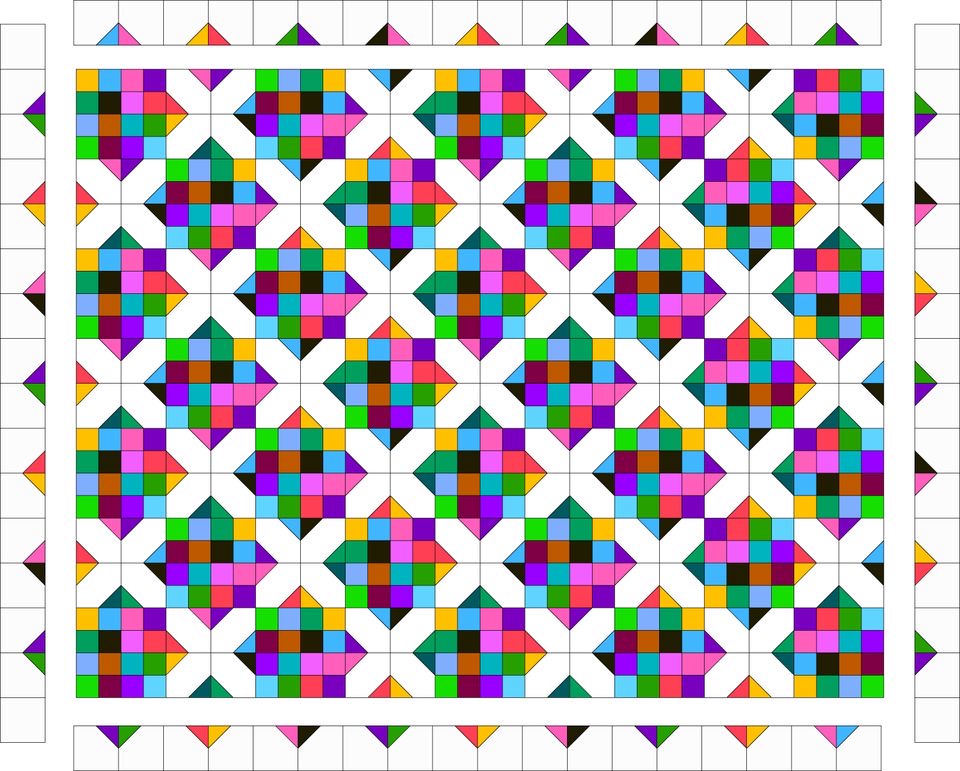
- Arrange the quilt blocks in seven rows as shown, alternating block types. A design wall or other flat surface can help you decide if you like the color arrangement. Shift blocks around until you’re happy with the appearance.
- Sew together the blocks in each row. Press new seam allowances in rows in connecting rows in opposite directions.
- Join the rows and press the quilt top.
Sew a Patchwork Border
- Cut (68) 4-1/2″ x 4-1/2″ squares, scrappy or from your first background fabric—an extra yard should do it if you have fabric left from the quilt’s X blocks. If not, 1-1/4 yards.
- Cut (64) 2-1/2″ x 2-1/2″ squares of scrappy fabrics.
- Use the same method as before to sew a small square to one corner of 64 background squares. Trim and press.
Sew the Patchwork Border to the Quilt
- Arrange two 18 border blocks into two rows as illustrated along the quilt’s longest edge, twisting them around to place small squares in the correct positions. Sew the borders together and press.
- Sew the borders to the quilt, matching ends and center sections first and then pin matching all seams. Press.
- Sew two more borders, arranging triangles as shown and placing a plain background square at each end of each border. Sew and press.
- Sew short borders to the quilt and press.
Finishing the Quilt
- I’m still working to re-write all of my basic instructions. Mark for quilting if necessary.
- You’ll need a quilt backing that measures about 66″ x 82″, or the size required for a specific quilting method.
- Choose a batting that’s appropriate for the way you wish to use the quilt (about the same size as the backing).
- For continuous mitered binding, make a doublefold strip about 280″ long.