More Cutting for Mystery Quilt
Fabric F
- (48) 2-1/2″ x 2-1/2″ squares
- Draw a diagonal line from one corner to the other on the reverse of each square
- Label F1
Fabric A
- (96) 2-1/2″ x 2-1/2″ squares
- Label A2
Fabric A
- (12) 5-1/4″ x 5-1/4″ Squares
- Label A3
Fabric C
- (12) 5-1/4″ x 5-1/4″ Squares
- Draw a diagonal line from one corner to the opposite corner on the reverse of each
- Label C1
Read through all of the pages before you begin – some are still in mystery quilt format but reading everything will reveal all of the steps and options.
Always clip away the little dog-ear triangles that appear at the ends of some angled seams, including the units shown below.
Grab fabrics cut earlier:
- (12) 4-1/2″ x 4-1/2″ A1 squares
- (48) 2-1/2″ x 2-1/2″ F1 squares with line marked on the back
Refer to the illustration, left to right and top to bottom, if making these patchwork units is new to you.
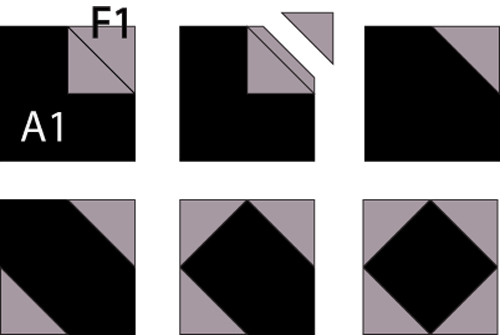
Sew Square in a Square Patchwork
- Place an F1 square in the upper right corner of an A1 square, all outer edges aligned and marked line angled as shown.
- Secure with a straight pin to keep fabrics from shifting if you aren’t sure they’ll stay in place as you sew.
- Sew a seam along the full length of the line.
- Remove from the sewing machine and press as-is to set the seam.
- Cut through both layers about 1/4″ past the seam, removing the corner.
- Carefully flip the new F1 triangle right side up, finger pressing before pressing carefully with the iron.
- Repeat to add another F1 square to the opposite corner of the A1 square.
- Repeat to add F1 pieces to remaining two corners.
- The patchwork should measure 4-1/2″ x 4-1/2″.
- Repeat to make a total of 12 square in a square units.
- Mark the squares #1.
Sewing Options
- The patchwork goes together more quickly if you chain piece. Prepare one corner of all twelve large squares and secure the small squares with a pin. Feed the patchwork units through the sewing machine one after the other without breaking the threads between units. When all twelve are complete, remove from the machine and clip the connecting threads. Press as explained above and then use the same method to sew remaining corners in groups.
- Like some other types of quick piecing, this method does result in a bit of wastage when corners are clipped. You could sew another seam about 1/2″ beyond the first. When corners are trimmed you’ll have a set of (very small) half square triangle units.