Extend the Quilt’s Layout with a Patchwork Border
A patchwork border made from a total of 16 more flying geese separated by strips of 4-1/2″ wide Fabric A extends the quilt’s design. Geese are stacked in pairs to create points at the middle row of the blocks made with square in a square units. Take a look at the border on the previous page.
You’ll need eight more Geese 1 and eight more Geese 3. Use the no waste method to create the geese or any other method you prefer as long as each flying geese unit finishes at 2″ x 4″ (should measure 2-1/2″ x 4-1/2″ after assembly).
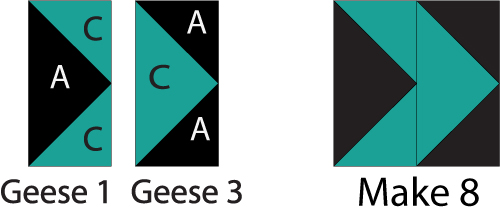
Geese #1
- (2) 5-1/4″ x 5-1/4″ Fabric A squares
- (8) 2-7/8″ x 2-7/8″ Fabric C squares with a diagonal line on the reverse side as before
- Make eight flying geese that measure 2-1/2″ x 4-1/2″
Geese #3
- (2) 5-1/4″ x 5-1/4″ Fabric C squares
- (8) 2-7/8″ x 2-7/8″ Fabric A squares with a diagonal line on the reverse side as before
- Make eight flying geese that measure 2-1/2″ x 4-1/2″
Sew the 16 flying geese into eight pairs as shown below — they are arranged exactly as the same two geese types were arranged in the second quilt block. Press seam allowances either direction. Each 2-geese unit should measure 4-1/2″ x 4-1/2″.
Fabric Strips for the Patchwork Border
If all of your quilt blocks measured 12-1/2″ x 12-1/2″ after assembly and you sewed blocks together with the same seam allowance that resulted in that size your quilt top (without a border) should be its ‘textbook size’ — 60-1/2″ x 60-1/2″. But there’s a good chance that your quilt’s size is a bit different. If the difference is small, such as under 3/8″ per side, cutting the ‘textbook size’ Fabric A strips should work just fine. Differences can be eased in to make sure that the flying geese units end up exactly where they should be.
If you’re a beginning quilter don’t be tempted to measure a quilt along its outer edges because they are likely skewed a bit. Instead, measure through the quilt’s vertical midpoint and horizontal midpoint to determine size and use border strips to gently bring the quilt into square.
Cutting for Fabric A Strips
Side Borders
- (4) 4-1/2″ x 16-1/2″ strips
- (2) 4-1/2″ x 20-1/2″ strips
Top and Bottom Borders
- (6) 4-1/2″ x 20-1/2″ strips
If your quilt top does not measure 60-1/2″ square (it is more likely to be smaller than larger) you may need to adjust the lengths of the fabric A strips. However, it is very important that side borders are the same length and that top and bottom borders are the same lengths. Creating opposite borders of different lengths will skew the quilt.
Construct two of each border type. This is a square quilt so it doesn’t really matter which two sides you call side borders and which two you call the top and bottom borders.
Side borders are each sewn with a 20-1/2″ long strip at their center and a geese unit at each end. The shorter strips are sewn to the opposite side of each geese unit.
Shown unsewn
- Sew border components together and press seam allowances towards the long strips.
- Match the ends of a border to the quilt and pin.
- Match the geese to the geese in two blocks — the geese should point away from the quilt — they are extensions of the geese design in blocks. Pin to secure.
- Match the remaining border strips, easing in lengths if necessary and pinning to secure.
- Sew the border and press the seam allowance towards the border.
- Repeat to sew a border to the opposite side of the quilt.
Top and bottom borders are sewn in much the same way, but with Fabric A strips of different lengths. They look much like the image shown above (unsewn) bur all A strips are the same length.
Sew a 20-1/2″ long strip between two geese units. Sew an additional 20-1/2″ strip to the opposite side of the geese. Repeat for the second border. Use the same method described above to sew the borders to the quilt.