Put Those Flying Geese to Good Use
There’s just a bit more cutting before you assemble the remaining quilt blocks. Cut (52) 2-1/2″ x 4-1/2″ rectangles of Fabric A. There’s no need to label them because you’ll use the rectangles right away.
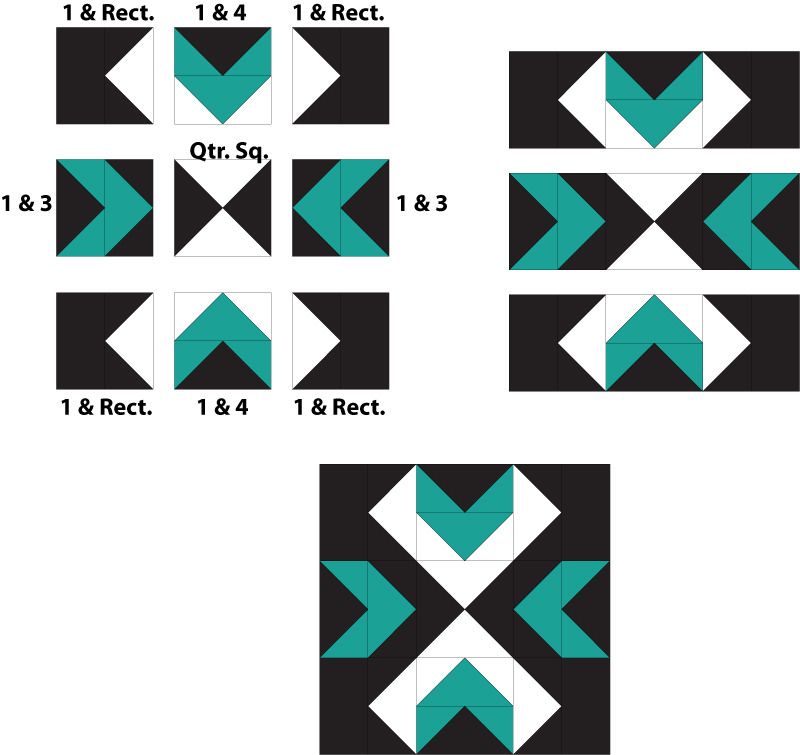
This isn’t a difficult quilt block but it does take a few minutes to wrap your head around its layout. There are four different kinds of flying geese in each block, a quarter square triangle unit, and four rectangles — a bunch of patchwork.
A visual guide to the block’s assembly may be best because words make the layout seem way more confusing than it really is. So here goes.
To Make One Block, Gather:
- (4) Geese #1
- (4) Geese #2
- (2) Geese #4
- (2) Geese #3
- (4) 2-1/2 x 4-1/2″ Fabric A Rectangles
- (1) A/B quarter square triangle unit for block center

- Assemble the four types of patchwork units shown above, orienting geese as shown. The line between the rectangle and Geese #2 isn’t visible — the rectangle sits above Geese #2, at its peak.
- Press seam allowances towards the least bulky patchwork. All units should measure 4-1/2″ x 4-1/2″.
- Grab one of your quarter square triangle units and combine it with the geese patchwork to create three rows, each made up of three patchwork units. The quarter square triangle unit sits at the block’s center. Check placement of angles and colors carefully before you sew.
- Sew the components of each row together. Press seam allowances towards the corners in the top and bottom rows and towards the center in the middle row.
- Join the rows and press the quilt block. The blocks are alternated with the quilt blocks sewn on the previous page. Press new seam allowances in opposite directions of that block if possible (not required — just match carefully when assembling the quilt top).
- The quilt block should measure 12-1/2″ x 12-1/2″.
- Make a total of 13 quilt blocks.