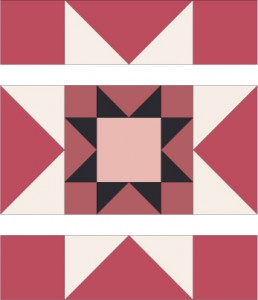
Rising Star Quilt Block Pattern
Rising Star is one of many patchwork quilt blocks that fall under the umbrella of the Evening Star (also called Sawtooth Star) design.
All of the stars have the basic eight star-tip layout in their outermost rows — see the lightest patches of the block shown. Blocks become diverse as other aspects of their patchwork are altered. To create Rising Star quilt blocks, the central portion of the design becomes a second image of the basic Evening Star.
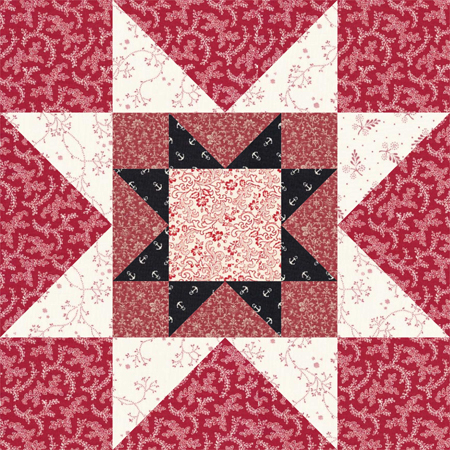 My Rising Star block is composed mostly of contrasting redwork-like fabrics, although a black print is used to define the center star. Change the color and contrast in any way you like, controlled or scrappy.
Finished Rising Star Quilt Block: 12″ x 12″
Cutting Instructions for One Rising Star Quilt Block
Red print for outer background:
- (4) 3-1/2″ x 3-1/2″ squares
- (4) 3-1/2″ x 6-1/2″ rectangles
White fabric with red print for large star tips:
- (8) 3-1/2″ x 3-1/2″ squares
Smaller-scale red print for inner star background:
- (4) 2″ x 2″ squares
- (4) 2″ x 3-1/2″ rectangles
Black print for inner star tips:
- (8) 2″ x 2″ squares
A second white with red print for block center square:
- (1) 3-1/2″ x 3-1/2″ square
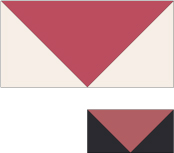
Make Flying Geese
We’ll make star tips with Flying Geese units. I mentioned two different quick pieced geese techniques in the Frayed Variable Star quilt block pattern — one using rectangles and squares as shown in the cutting instructions on this page. Don’t cut those patches just yet if you’d like to make easy no waste Flying Geese — follow the link for instructions and sew geese that finish at 3″ x 6″.
-
To use the method that suits our cutting chart, draw a diagonal line from one corner to the opposite corner on the reverse side of the squares cut for Flying Geese tips (larger white/red squares and smaller black squares).
- Follow the instructions in my article – how to make quick pieced pieced flying geese – to sew a larger white square to each end of a 3-1/2″ x 6-1/2″ red bar. Seams are sewn directly on the line for this method.
- The geese unit will measure 3-1/2″ x 6-1/2″ and look like the illustration shown above right. Make three more units.
- Use the same technique to sew the 2″ black squares to ends of the smaller red rectangles. Each of the four units will measure 2″ x 3-1/2″.
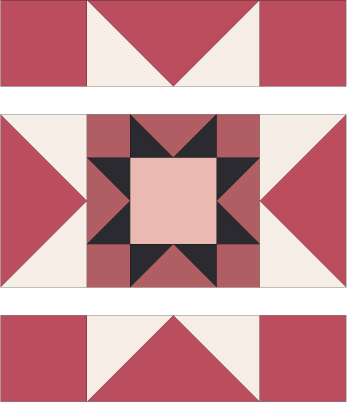
Assemble the Rising Star Quilt Block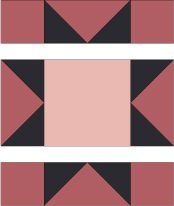
Remaining pieces are squares — how simple is that! Let’s put the block together.
- Assemble the center star first. Arrange the four small flying geese units, the 2″ background squares and the 3-1/2″ center square into three rows. Sew components of each row together and press seam allowances towards the plain squares.
- Sew the rows together and press. The center unit should measure 6-1/2″ x 6-1/2″.
 Arrange the center star, background squares and larger flying geese into three rows. Sew the components of each row together and press seam allowances away from the flying geese. (Pressing the other direction is fine, and may work best with your fabrics. The important thing is to press seam allowances in adjoining rows in opposite directions to help match seam intersections.)
- Sew the rows together and press the quilt block. The block should measure 12-1/2″ x 12-1/2″.
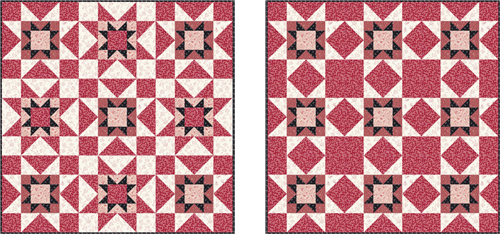
The image below offers two previews of nine Rising Star quilt blocks sewn side by side into three tows. In one quilt, blocks are identical. In the other, colors are reversed in alternating blocks to add motion and a bit of extra colorplay. Which do you prefer?